
目录
现在的配置中心最主流的还是 nacos,结合 nacos 动态刷新的开源组件也有很多,今天我们来学习下 nacos 配置中心的工程化应用。
Naocs 配置中心
官方文档: https://github.com/alibaba/spring-cloud-alibaba/wiki/Nacos-config
Nacos 提供用于存储配置和其他元数据的 key/value 存储,为分布式系统中的外部化配置提供服务器端和客户端支持。使用 Spring Cloud Alibaba Nacos Config,您可以在 Nacos Server 集中管理你 Spring Cloud 应用的外部属性配置。
Nacos 监听变化
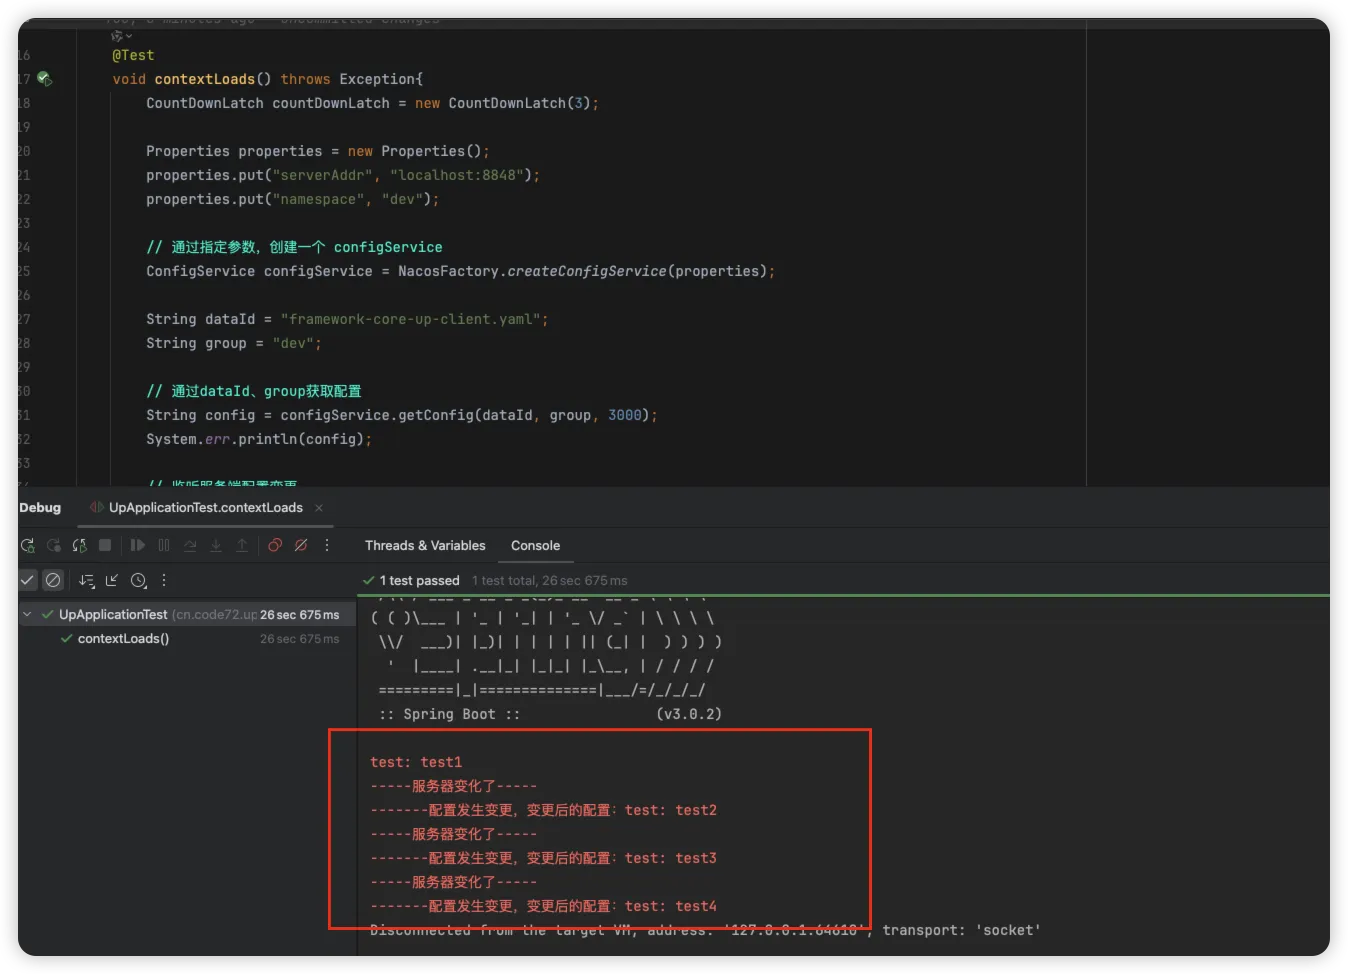
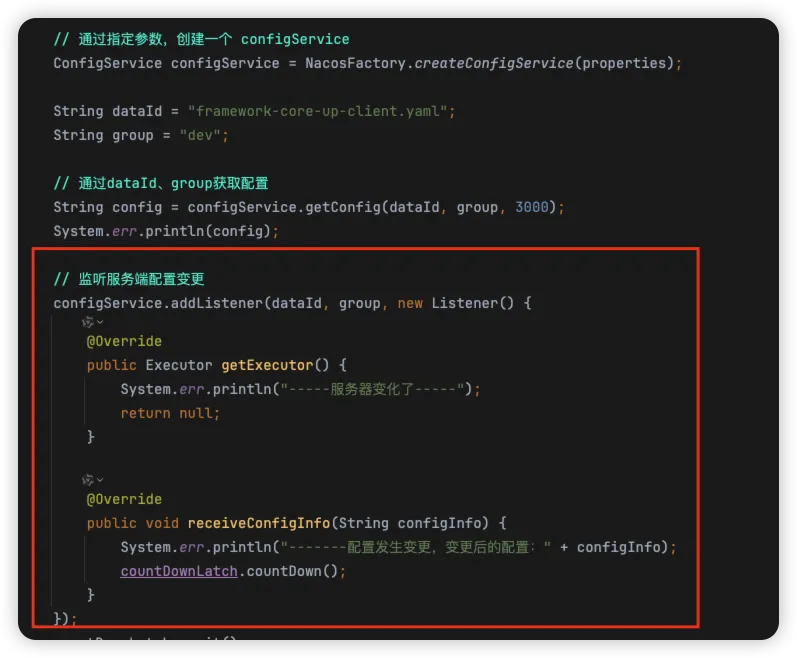
在介绍 Nacos 配置中心实现原理之前我们先准备一个基础的案例,来演示下怎么获取配置中心的配置信息和及时获取Nacos配置中心的更新。案例代码如下:
java@Test
void contextLoads() throws Exception{
    CountDownLatch countDownLatch = new CountDownLatch(3);

    Properties properties = new Properties();
    properties.put("serverAddr", "localhost:8848");
    properties.put("namespace", "dev");

    // 通过指定参数,创建一个 configService
    ConfigService configService = NacosFactory.createConfigService(properties);

    String dataId = "framework-core-up-client.yaml";
    String group = "dev";

    // 通过dataId、group获取配置
    String config = configService.getConfig(dataId, group, 3000);
    System.err.println(config);

    // 监听服务端配置变更
    configService.addListener(dataId, group, new Listener() {
        @Override
        public Executor getExecutor() {
            System.err.println("-----服务器变化了-----");
            return null;
        }

        @Override
        public void receiveConfigInfo(String configInfo) {
            System.err.println("-------配置发生变更,变更后的配置:" + configInfo);
            countDownLatch.countDown();
        }
    });
    countDownLatch.await();
}
启动服务后可以获取到配置中心中的信息,当配置中心的信息发送变化后同步的也可以获取到对应的信息
客户端获取配置信息
通过上面的 Nacos 监听变化的案例我们可以来分析下 Nacos 的客户端是如何来获取到 Nacos 服务端的配置信息的。分析的入口方法是上述代码中 NacosConfigService #getConfig 方法
java@Override
public String getConfig(String dataId, String group, long timeoutMs) throws NacosException {
    return getConfigInner(namespace, dataId, group, timeoutMs);
}

private String getConfigInner(String tenant, String dataId, String group, long timeoutMs) throws NacosException {
    // 如果group为空,则设置为默认值
    group = blank2defaultGroup(group);
    // 参数检查
    ParamUtils.checkKeyParam(dataId, group);
    ConfigResponse cr = new ConfigResponse();

    cr.setDataId(dataId);
    cr.setTenant(tenant);
    cr.setGroup(group);

    // 获取本地配置内容
    String content = LocalConfigInfoProcessor.getFailover(worker.getAgentName(), dataId, group, tenant);
    if (content != null) {
        LOGGER.warn("[{}] [get-config] get failover ok, dataId={}, group={}, tenant={}, config={}",
                worker.getAgentName(), dataId, group, tenant, ContentUtils.truncateContent(content));
        cr.setContent(content);
        String encryptedDataKey = LocalEncryptedDataKeyProcessor
                .getEncryptDataKeyFailover(agent.getName(), dataId, group, tenant);
        cr.setEncryptedDataKey(encryptedDataKey);
        configFilterChainManager.doFilter(null, cr);
        content = cr.getContent();
        return content;
    }

    try {
        // 获取服务端配置内容
        ConfigResponse response = worker.getServerConfig(dataId, group, tenant, timeoutMs, false);
        cr.setContent(response.getContent());
        cr.setEncryptedDataKey(response.getEncryptedDataKey());
        configFilterChainManager.doFilter(null, cr);
        content = cr.getContent();

        return content;
    } catch (NacosException ioe) {
        if (NacosException.NO_RIGHT == ioe.getErrCode()) {
            throw ioe;
        }
        LOGGER.warn("[{}] [get-config] get from server error, dataId={}, group={}, tenant={}, msg={}",
                worker.getAgentName(), dataId, group, tenant, ioe.toString());
    }

    // 获取本地快照内容
    content = LocalConfigInfoProcessor.getSnapshot(worker.getAgentName(), dataId, group, tenant);
    if (content != null) {
        LOGGER.warn("[{}] [get-config] get snapshot ok, dataId={}, group={}, tenant={}, config={}",
                worker.getAgentName(), dataId, group, tenant, ContentUtils.truncateContent(content));
    }
    cr.setContent(content);
    String encryptedDataKey = LocalEncryptedDataKeyProcessor
            .getEncryptDataKeySnapshot(agent.getName(), dataId, group, tenant);
    cr.setEncryptedDataKey(encryptedDataKey);
    configFilterChainManager.doFilter(null, cr);
    content = cr.getContent();
    return content;
}
我们来看下如何获取服务端的配置内容,进入到getServerConfig方法中查看具体的逻辑。
Javapublic ConfigResponse getServerConfig(String dataId, String group, String tenant, long readTimeout, boolean notify)
        throws NacosException {
    if (StringUtils.isBlank(group)) {
        group = Constants.DEFAULT_GROUP;
    }
    // 查询服务器配置
    return this.agent.queryConfig(dataId, group, tenant, readTimeout, notify);
}

@Override
public ConfigResponse queryConfig(String dataId, String group, String tenant, long readTimeouts, boolean notify)
        throws NacosException {
    // 构建配置查询对象
    ConfigQueryRequest request = ConfigQueryRequest.build(dataId, group, tenant);
    // 添加是否通知的请求头
    request.putHeader(NOTIFY_HEADER, String.valueOf(notify));
    // rpc客户端
    RpcClient rpcClient = getOneRunningClient();
    // 如果是通知请求,则使用缓存数据的rpc客户端
    if (notify) {
        CacheData cacheData = cacheMap.get().get(GroupKey.getKeyTenant(dataId, group, tenant));
        if (cacheData != null) {
            rpcClient = ensureRpcClient(String.valueOf(cacheData.getTaskId()));
        }
    }
    // 发送请求
    ConfigQueryResponse response = (ConfigQueryResponse) requestProxy(rpcClient, request, readTimeouts);

    // 构建配置响应的对象
    ConfigResponse configResponse = new ConfigResponse();
    // 请求的响应成功
    if (response.isSuccess()) {
        // 保存快照
        LocalConfigInfoProcessor.saveSnapshot(this.getName(), dataId, group, tenant, response.getContent());
        // 配置内容
        configResponse.setContent(response.getContent());
        // 配置类型
        String configType;
        if (StringUtils.isNotBlank(response.getContentType())) {
            configType = response.getContentType();
        } else {
            configType = ConfigType.TEXT.getType();
        }
        configResponse.setConfigType(configType);
        String encryptedDataKey = response.getEncryptedDataKey();
        // 保存密钥快照
        LocalEncryptedDataKeyProcessor
                .saveEncryptDataKeySnapshot(agent.getName(), dataId, group, tenant, encryptedDataKey);
        configResponse.setEncryptedDataKey(encryptedDataKey);
        return configResponse;
    } else if (response.getErrorCode() == ConfigQueryResponse.CONFIG_NOT_FOUND) {
        LocalConfigInfoProcessor.saveSnapshot(this.getName(), dataId, group, tenant, null);
        LocalEncryptedDataKeyProcessor.saveEncryptDataKeySnapshot(agent.getName(), dataId, group, tenant, null);
        return configResponse;
    } else if (response.getErrorCode() == ConfigQueryResponse.CONFIG_QUERY_CONFLICT) {
        LOGGER.error(
                "[{}] [sub-server-error] get server config being modified concurrently, dataId={}, group={}, "
                        + "tenant={}", this.getName(), dataId, group, tenant);
        throw new NacosException(NacosException.CONFLICT,
                "data being modified, dataId=" + dataId + ",group=" + group + ",tenant=" + tenant);
    } else {
        LOGGER.error("[{}] [sub-server-error]  dataId={}, group={}, tenant={}, code={}", this.getName(), dataId,
                group, tenant, response);
        throw new NacosException(response.getErrorCode(),
                "http error, code=" + response.getErrorCode() + ",msg=" + response.getMessage() + ",dataId="
                        + dataId + ",group=" + group + ",tenant=" + tenant);

    }
}
上面的代码逻辑中主要是构建配置查询对象,通过 rpc 客户端发送请求,获取到响应数据后,保存快照数据,其他情况抛出相关异常信息
服务端响应配置
根据 ConfigQueryRequest 的请求对象,查找到其服务端接口
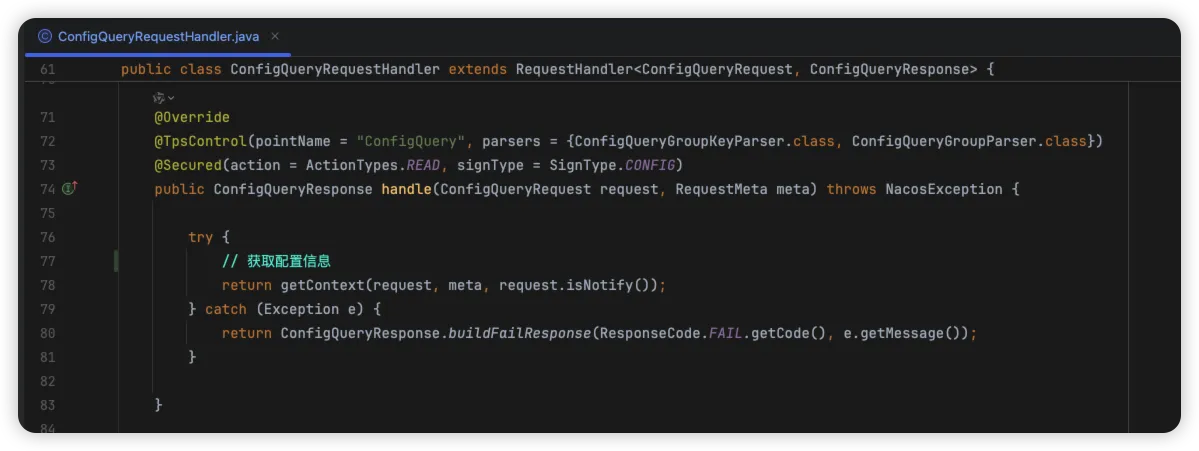
来看下其如何处理获取配置信息的这个请求的
Javaprivate ConfigQueryResponse getContext(ConfigQueryRequest configQueryRequest, RequestMeta meta, boolean notify)
        throws UnsupportedEncodingException {
    String dataId = configQueryRequest.getDataId();
    String group = configQueryRequest.getGroup();
    String tenant = configQueryRequest.getTenant();
    String clientIp = meta.getClientIp();
    String tag = configQueryRequest.getTag();

    // 响应信息
    ConfigQueryResponse response = new ConfigQueryResponse();

    final String groupKey = GroupKey2
            .getKey(configQueryRequest.getDataId(), configQueryRequest.getGroup(), configQueryRequest.getTenant());

    String autoTag = configQueryRequest.getHeader(com.alibaba.nacos.api.common.Constants.VIPSERVER_TAG);

    String requestIpApp = meta.getLabels().get(CLIENT_APPNAME_HEADER);

    int lockResult = tryConfigReadLock(groupKey);

    boolean isBeta = false;
    boolean isSli = false;
    if (lockResult > 0) {
        //FileInputStream fis = null;
        try {
            // 获取缓存中的内容类型
            String md5 = Constants.NULL;
            long lastModified = 0L;
            CacheItem cacheItem = ConfigCacheService.getContentCache(groupKey);
            if (cacheItem != null) {
                if (cacheItem.isBeta()) {
                    if (cacheItem.getIps4Beta().contains(clientIp)) {
                        isBeta = true;
                    }
                }
                String configType = cacheItem.getType();
                response.setContentType((null != configType) ? configType : "text");
            }

            // 获取
            File file = null;
            ConfigInfoBase configInfoBase = null;
            PrintWriter out = null;
            if (isBeta) {
                md5 = cacheItem.getMd54Beta();
                lastModified = cacheItem.getLastModifiedTs4Beta();
                // 直接从数据库中获取
                if (PropertyUtil.isDirectRead()) {
                    // 查询数据库配置信息
                    configInfoBase = persistService.findConfigInfo4Beta(dataId, group, tenant);
                } else {
                    // 缓存文件中获取
                    file = DiskUtil.targetBetaFile(dataId, group, tenant);
                }
                response.setBeta(true);
            } else {
                if (StringUtils.isBlank(tag)) {
                    if (isUseTag(cacheItem, autoTag)) {
                        if (cacheItem != null) {
                            if (cacheItem.tagMd5 != null) {
                                md5 = cacheItem.tagMd5.get(autoTag);
                            }
                            if (cacheItem.tagLastModifiedTs != null) {
                                lastModified = cacheItem.tagLastModifiedTs.get(autoTag);
                            }
                        }
                        if (PropertyUtil.isDirectRead()) {
                            configInfoBase = persistService.findConfigInfo4Tag(dataId, group, tenant, autoTag);
                        } else {
                            file = DiskUtil.targetTagFile(dataId, group, tenant, autoTag);
                        }
                        response.setTag(URLEncoder.encode(autoTag, Constants.ENCODE));

                    } else {
                        md5 = cacheItem.getMd5();
                        lastModified = cacheItem.getLastModifiedTs();
                        if (PropertyUtil.isDirectRead()) {
                            configInfoBase = persistService.findConfigInfo(dataId, group, tenant);
                        } else {
                            file = DiskUtil.targetFile(dataId, group, tenant);
                        }
                        if (configInfoBase == null && fileNotExist(file)) {
                            // FIXME CacheItem
                            // No longer exists. It is impossible to simply calculate the push delayed. Here, simply record it as - 1.
                            ConfigTraceService.logPullEvent(dataId, group, tenant, requestIpApp, -1,
                                    ConfigTraceService.PULL_EVENT_NOTFOUND, -1, clientIp, false);

                            // pullLog.info("[client-get] clientIp={}, {},
                            // no data",
                            // new Object[]{clientIp, groupKey});

                            response.setErrorInfo(ConfigQueryResponse.CONFIG_NOT_FOUND, "config data not exist");
                            return response;
                        }
                    }
                } else {
                    if (cacheItem != null) {
                        if (cacheItem.tagMd5 != null) {
                            md5 = cacheItem.tagMd5.get(tag);
                        }
                        if (cacheItem.tagLastModifiedTs != null) {
                            Long lm = cacheItem.tagLastModifiedTs.get(tag);
                            if (lm != null) {
                                lastModified = lm;
                            }
                        }
                    }
                    if (PropertyUtil.isDirectRead()) {
                        configInfoBase = persistService.findConfigInfo4Tag(dataId, group, tenant, tag);
                    } else {
                        file = DiskUtil.targetTagFile(dataId, group, tenant, tag);
                    }
                    if (configInfoBase == null && fileNotExist(file)) {
                        // FIXME CacheItem
                        // No longer exists. It is impossible to simply calculate the push delayed. Here, simply record it as - 1.
                        ConfigTraceService.logPullEvent(dataId, group, tenant, requestIpApp, -1,
                                ConfigTraceService.PULL_EVENT_NOTFOUND, -1, clientIp, false);

                        // pullLog.info("[client-get] clientIp={}, {},
                        // no data",
                        // new Object[]{clientIp, groupKey});

                        response.setErrorInfo(ConfigQueryResponse.CONFIG_NOT_FOUND, "config data not exist");
                        return response;

                    }
                }
            }

            response.setMd5(md5);

            // 数据库中读取的数据
            if (PropertyUtil.isDirectRead()) {
                response.setLastModified(lastModified);
                response.setContent(configInfoBase.getContent());
                response.setEncryptedDataKey(configInfoBase.getEncryptedDataKey());
                response.setResultCode(ResponseCode.SUCCESS.getCode());

            } else {
                // 文件中读取的数据
                String content = null;
                try {
                    content = readFileContent(file);
                    response.setContent(content);
                    response.setLastModified(lastModified);
                    response.setResultCode(ResponseCode.SUCCESS.getCode());
                    if (isBeta) {
                        response.setEncryptedDataKey(cacheItem.getEncryptedDataKeyBeta());
                    } else {
                        response.setEncryptedDataKey(cacheItem.getEncryptedDataKey());
                    }
                } catch (IOException e) {
                    response.setErrorInfo(ResponseCode.FAIL.getCode(), e.getMessage());
                    return response;
                }

            }

            LogUtil.PULL_CHECK_LOG.warn("{}|{}|{}|{}", groupKey, clientIp, md5, TimeUtils.getCurrentTimeStr());

            final long delayed = System.currentTimeMillis() - lastModified;

            // TODO distinguish pull-get && push-get
            /*
             Otherwise, delayed cannot be used as the basis of push delay directly,
             because the delayed value of active get requests is very large.
             */
            ConfigTraceService.logPullEvent(dataId, group, tenant, requestIpApp, lastModified,
                    ConfigTraceService.PULL_EVENT_OK, notify ? delayed : -1, clientIp, notify);

        } finally {
            releaseConfigReadLock(groupKey);
        }
    } else if (lockResult == 0) {

        // FIXME CacheItem No longer exists. It is impossible to simply calculate the push delayed. Here, simply record it as - 1.
        ConfigTraceService
                .logPullEvent(dataId, group, tenant, requestIpApp, -1, ConfigTraceService.PULL_EVENT_NOTFOUND, -1,
                        clientIp, notify);
        response.setErrorInfo(ConfigQueryResponse.CONFIG_NOT_FOUND, "config data not exist");

    } else {
        PULL_LOG.info("[client-get] clientIp={}, {}, get data during dump", clientIp, groupKey);
        response.setErrorInfo(ConfigQueryResponse.CONFIG_QUERY_CONFLICT,
                "requested file is being modified, please try later.");
    }
    return response;
}
上述代码中,核心的是通过 findConfigInfo4Beta 方法来获取对应的配置信息,其实现一个是 嵌入式存储,一个是扩展的 外部存储 方式。
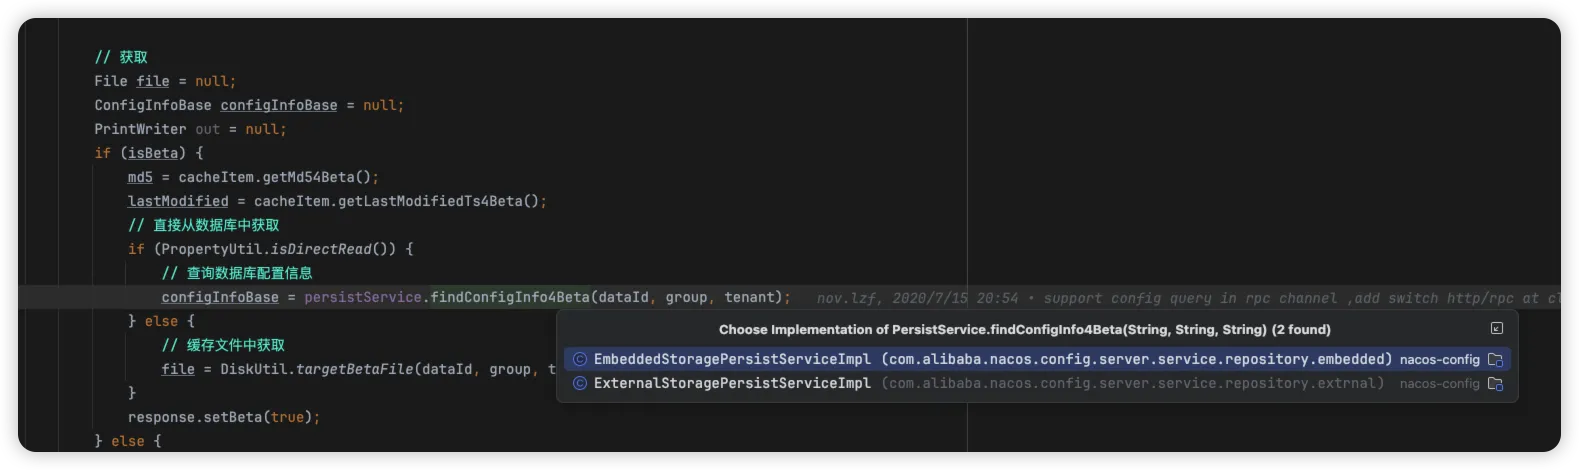
我们来看下外部存储 ExternalStoragePersistServiceImpl 的实现,其通过 jdbcTemplate 实现查询 mysql 的数据
Java@Override
public ConfigInfoBetaWrapper findConfigInfo4Beta(final String dataId, final String group, final String tenant) {
    String tenantTmp = StringUtils.isBlank(tenant) ? StringUtils.EMPTY : tenant;
    try {
        // 配置信息mapper
        ConfigInfoBetaMapper configInfoBetaMapper = (ConfigInfoBetaMapper) mapperManager.findMapper(dataSource, TableConstant. CONFIG_INFO_BETA).get();
        // 查询对应sql
        return this.jt.queryForObject(configInfoBetaMapper.select(Arrays.asList("id", "data_id", "group_id", "tenant_id", "app_name", "content", "beta_ips", "encrypted_data_key"),
                        Arrays.asList("data_id", "group_id", "tenant_id")),
                new Object[] {dataId, group, tenantTmp}, CONFIG_INFO_BETA_WRAPPER_ROW_MAPPER);
    } catch (EmptyResultDataAccessException e) { // Indicates that the data does not exist, returns null.
        return null;
    } catch (CannotGetJdbcConnectionException e) {
        LogUtil.FATAL_LOG.error("[db-error] " + e.toString(), e);
        throw e;
    }
}
到此处,查询数据后构建新响应对象,进行返回。
如何监听配置的变化?
我们从上述的案例代码进行分析,了解到主动获取配置的流程,从服务端获取配置后,保存到本地的快照中,那服务端的配置信息做了更新后对应的客户端是如何及时获取到相关的配置信息的呢?我们接下来继续分析下其实现
客户端定时拉取
对应的入口代码还是从我们前面介绍的案例入手,我们来看下其监听是怎么实现的
从创建的 ConfigService 对象开始,通过反射构建了 NacosConfigService 对象
Javapublic static ConfigService createConfigService(Properties properties) throws NacosException {
    try {
        // 配置类
        Class<?> driverImplClass = Class.forName("com.alibaba.nacos.client.config.NacosConfigService");
        // 构造方法
        Constructor constructor = driverImplClass.getConstructor(Properties.class);
        // 创建实例
        ConfigService vendorImpl = (ConfigService) constructor.newInstance(properties);
        return vendorImpl;
    } catch (Throwable e) {
        throw new NacosException(NacosException.CLIENT_INVALID_PARAM, e);
    }
}
来看下 NacosConfigService 对象做了哪些操作
Javapublic NacosConfigService(Properties properties) throws NacosException {
    // 验证初始化参数
    ValidatorUtils.checkInitParam(properties);

    // 初始化命名空间
    initNamespace(properties);
    // 初始化过滤器链
    this.configFilterChainManager = new ConfigFilterChainManager(properties);
    // 服务器列表管理器
    ServerListManager serverListManager = new ServerListManager(properties);
    serverListManager.start();

    // 客户端工作器
    this.worker = new ClientWorker(this.configFilterChainManager, serverListManager, properties);
    // will be deleted in 2.0 later versions
    agent = new ServerHttpAgent(serverListManager);
}
在观察下 addListener 方法,看其内部是如何处理的
java@Override
public void addListener(String dataId, String group, Listener listener) throws NacosException {
    worker.addTenantListeners(dataId, group, Arrays.asList(listener));
}
通过上述调用中,可以看到其核心是通过 ClientWorker #addTenantListeners 添加监听器实现的,我们来看下 ClientWorker 对象的构建
javapublic ClientWorker(final ConfigFilterChainManager configFilterChainManager, ServerListManager serverListManager,
        final Properties properties) throws NacosException {
    // 初始化过滤器链管理器
    this.configFilterChainManager = configFilterChainManager;

    // 初始化长连接的时间属性
    init(properties);

    // 配置RPC客户端
    agent = new ConfigRpcTransportClient(properties, serverListManager);
    // 获取线程数
    int count = ThreadUtils.getSuitableThreadCount(THREAD_MULTIPLE);
    // 创建定时线程池
    ScheduledExecutorService executorService = Executors
            .newScheduledThreadPool(Math.max(count, MIN_THREAD_NUM), r -> {
                Thread t = new Thread(r);
                t.setName("com.alibaba.nacos.client.Worker");
                t.setDaemon(true);
                return t;
            });
    agent.setExecutor(executorService);
    // 开始
    agent.start();
}
线程池参数的选择
你还在为线程池创建的参数而忧愁吗?源码中给出完美示例,通过 ThreadUtils.getSuitableThreadCount(); 计算出核心线程数
java/**
 * 根据CPU核心数计算合适的线程数
 *
 * @param threadMultiple 线程数相对于CPU核心数的倍数
 * @return 合适的线程数量(2的幂次方)
 */
public static int getSuitableThreadCount(int threadMultiple) {
    // 获取当前系统的CPU核心数
    final int coreCount = PropertyUtils.getProcessorsCount();
    // 初始化工作线程数为1
    int workerCount = 1;
    // 通过左移操作找到大于等于 coreCount * threadMultiple 的最小2的幂次方数
    // 例如:如果 coreCount * threadMultiple = 6,那么 workerCount 将会是 8 (2^3)
    while (workerCount < coreCount * threadMultiple) {
        // 每次将workerCount左移1位(相当于乘以2)
        workerCount <<= 1;
    }
    // 返回计算出的合适的线程数
    return workerCount;
}
此处创建了一个定时线程池,同时给到RPC客户端中,我们来看下 start 方法做了哪些事
javapublic void start() throws NacosException {
    // 安全代理登录
    securityProxy.login(this.properties);
    // 定时刷新安全代理信息
    this.executor.scheduleWithFixedDelay(() -> securityProxy.login(properties), 0,
            this.securityInfoRefreshIntervalMills, TimeUnit.MILLISECONDS);
    // 启动
    startInternal();
}
其 startInternal 方法的实现,又查找到 ClientWorker 类中,在此处可到长轮询机制的实现
java@Override
public void startInternal() {
    // 定时任务
    executor.schedule(() -> {
        // 长轮询监听
        while (!executor.isShutdown() && !executor.isTerminated()) {
            try {
                // 5s间隔
                listenExecutebell.poll(5L, TimeUnit.SECONDS);
                if (executor.isShutdown() || executor.isTerminated()) {
                    continue;
                }
                // 执行配置监听
                executeConfigListen();
            } catch (Throwable e) {
                LOGGER.error("[ rpc listen execute ] [rpc listen] exception", e);
            }
        }
    }, 0L, TimeUnit.MILLISECONDS);
}
轮询机制
Nacos 就是利用了 长轮询机制,客户端会开启一个线程,不断向服务端发起一个配置是否存在变更的请求(30s超时),服务端收到请求后,如果配置不存在变更,并不会立即返回,而是当配置发生变更后,主动是否将消息回写给客户端。
- 短轮询:指客户端每隔一段时间向服务器发起一次请求,服务端收到请求后,进行处理,然后返回给客户端。
- 长轮询:指客户端向服务端发起一个带**超时时间(timeout)**的请求,并在连接超时前,不主动断开连接,需要服务端主动回写数据,否则将一直重复以上过程。
来看下 executeConfigListen 执行配置监听器的实现,主要做了以下2点
- 请求超时:无配置变更,开启下一次轮询请求
- 服务器返回数据:解析服务器返回数据,通过Nameserver、dataId、group重新回去服务器配置,更新本地缓存,触发事件监听,开启下一次轮询请求。
- 如果5分钟都没有从服务端拉取过配置,则进行一次全量拉取
java@Override
public void executeConfigListen() {
    // 创建两个Map分别存储需要监听和需要取消监听的缓存数据
    // listenCachesMap: 存储需要添加监听的缓存数据,按taskId分组
    // removeListenCachesMap: 存储需要移除监听的缓存数据,按taskId分组
    Map<String, List<CacheData>> listenCachesMap = new HashMap<>(16);
    Map<String, List<CacheData>> removeListenCachesMap = new HashMap<>(16);

    // 获取当前时间戳,用于判断是否需要进行全量同步
    long now = System.currentTimeMillis();

    // 判断是否需要全量同步:距离上次全量同步时间超过设定间隔(5分钟)
    boolean needAllSync = now - lastAllSyncTime >= ALL_SYNC_INTERNAL;

    // 遍历所有缓存数据,根据状态分类到不同的Map中
    for (CacheData cache : cacheMap.get().values()) {
        // 对每个缓存数据加锁,确保线程安全
        synchronized (cache) {
            // 如果缓存已与服务器同步
            if (cache.isSyncWithServer()) {
                // 检查监听器的MD5值,确认配置是否有变化
                cache.checkListenerMd5();

                // 如果不需要全量同步,则跳过该缓存数据
                if (!needAllSync) {
                    continue;
                }
            }

            // 根据缓存是否被标记为丢弃,决定放入哪个Map中
            // 如果缓存未被标记为丢弃(正常状态)
            if (!cache.isDiscard()) {
                // 并且未使用本地配置信息
                if (!cache.isUseLocalConfigInfo()) {
                    // 按taskId将缓存数据分组,存入listenCachesMap
                    List<CacheData> cacheDatas = listenCachesMap.get(String.valueOf(cache.getTaskId()));
                    // 如果该taskId对应的列表不存在,则创建新的列表
                    if (cacheDatas == null) {
                        cacheDatas = new LinkedList<>();
                        listenCachesMap.put(String.valueOf(cache.getTaskId()), cacheDatas);
                    }
                    // 将当前缓存数据添加到对应taskId的列表中
                    cacheDatas.add(cache);
                }
            }
            // 如果缓存已被标记为丢弃
            else if (cache.isDiscard()) {
                // 并且未使用本地配置信息
                if (!cache.isUseLocalConfigInfo()) {
                    // 按taskId将缓存数据分组,存入removeListenCachesMap
                    List<CacheData> cacheDatas = removeListenCachesMap.get(String.valueOf(cache.getTaskId()));
                    // 如果该taskId对应的列表不存在,则创建新的列表
                    if (cacheDatas == null) {
                        cacheDatas = new LinkedList<>();
                        removeListenCachesMap.put(String.valueOf(cache.getTaskId()), cacheDatas);
                    }
                    // 将当前缓存数据添加到对应taskId的列表中
                    cacheDatas.add(cache);
                }
            }
        }
    }

    // 标记本次执行过程中是否有配置发生变化
    boolean hasChangedKeys = false;

    // 处理需要监听的缓存数据
    if (!listenCachesMap.isEmpty()) {
        // 遍历每个taskId分组的缓存数据列表
        for (Map.Entry<String, List<CacheData>> entry : listenCachesMap.entrySet()) {
            String taskId = entry.getKey();
            // 创建时间戳映射表,记录处理前各缓存的最后修改时间
            Map<String, Long> timestampMap = new HashMap<>(listenCachesMap.size() * 2);

            List<CacheData> listenCaches = entry.getValue();
            // 记录当前所有待监听缓存的时间戳
            for (CacheData cacheData : listenCaches) {
                timestampMap.put(GroupKey.getKeyTenant(cacheData.dataId, cacheData.group, cacheData.tenant),
                        cacheData.getLastModifiedTs().longValue());
            }

            // 构造批量监听请求对象
            ConfigBatchListenRequest configChangeListenRequest = buildConfigRequest(listenCaches);
            // 设置为监听模式
            configChangeListenRequest.setListen(true);

            try {
                // 获取指定taskId的RPC客户端
                RpcClient rpcClient = ensureRpcClient(taskId);
                // 向服务器发送批量监听请求
                ConfigChangeBatchListenResponse configChangeBatchListenResponse = (ConfigChangeBatchListenResponse) requestProxy(
                        rpcClient, configChangeListenRequest);

                // 如果服务器响应成功
                if (configChangeBatchListenResponse.isSuccess()) {
                    // 创建变更键集合,存储发生变更的配置key
                    Set<String> changeKeys = new HashSet<>();

                    // 处理发生变更的配置项
                    if (!CollectionUtils.isEmpty(configChangeBatchListenResponse.getChangedConfigs())) {
                        // 标记存在变更的配置
                        hasChangedKeys = true;

                        // 遍历所有发生变更的配置
                        for (ConfigChangeBatchListenResponse.ConfigContext changeConfig : configChangeBatchListenResponse
                                .getChangedConfigs()) {
                            // 构造变更配置的唯一标识key
                            String changeKey = GroupKey
                                    .getKeyTenant(changeConfig.getDataId(), changeConfig.getGroup(),
                                            changeConfig.getTenant());
                            // 将变更key加入集合
                            changeKeys.add(changeKey);

                            // 检查该配置是否处于初始化状态
                            boolean isInitializing = cacheMap.get().get(changeKey).isInitializing();

                            // 刷新变更配置的内容并检查MD5
                            refreshContentAndCheck(changeKey, !isInitializing);
                        }
                    }

                    // 处理未发生变更的配置项
                    for (CacheData cacheData : listenCaches) {
                        // 构造当前缓存的唯一标识key
                        String groupKey = GroupKey
                                .getKeyTenant(cacheData.dataId, cacheData.group, cacheData.getTenant());

                        // 如果该配置未发生变更
                        if (!changeKeys.contains(groupKey)) {
                            // 同步状态:缓存数据MD5 = 服务器MD5 且 缓存数据MD5 = 所有监听器MD5
                            synchronized (cacheData) {
                                // 如果监听器列表非空
                                if (!cacheData.getListeners().isEmpty()) {
                                    // 获取之前记录的时间戳
                                    Long previousTimesStamp = timestampMap.get(groupKey);

                                    // 如果时间戳存在,且原子更新失败(说明期间有其他线程修改),则跳过
                                    if (previousTimesStamp != null && !cacheData.getLastModifiedTs()
                                            .compareAndSet(previousTimesStamp, System.currentTimeMillis())) {
                                        continue;
                                    }

                                    // 设置为已与服务器同步状态
                                    cacheData.setSyncWithServer(true);
                                }
                            }
                        }

                        // 设置初始化状态为false,表示已完成初始化
                        cacheData.setInitializing(false);
                    }
                }
            } catch (Exception e) {
                // 记录监听配置变更时发生的异常
                LOGGER.error("Async listen config change error ", e);
                try {
                    // 出现异常时短暂休眠50毫秒
                    Thread.sleep(50L);
                } catch (InterruptedException interruptedException) {
                    // 忽略中断异常
                }
            }
        }
    }

    // 处理需要取消监听的缓存数据
    if (!removeListenCachesMap.isEmpty()) {
        // 遍历每个taskId分组的需要取消监听的缓存数据
        for (Map.Entry<String, List<CacheData>> entry : removeListenCachesMap.entrySet()) {
            String taskId = entry.getKey();
            List<CacheData> removeListenCaches = entry.getValue();

            // 构造取消监听的请求对象
            ConfigBatchListenRequest configChangeListenRequest = buildConfigRequest(removeListenCaches);
            // 设置为取消监听模式
            configChangeListenRequest.setListen(false);

            try {
                // 获取指定taskId的RPC客户端
                RpcClient rpcClient = ensureRpcClient(taskId);
                // 发送取消监听请求
                boolean removeSuccess = unListenConfigChange(rpcClient, configChangeListenRequest);

                // 如果取消监听成功
                if (removeSuccess) {
                    // 遍历所有需要取消监听的缓存数据
                    for (CacheData cacheData : removeListenCaches) {
                        // 加锁确保线程安全
                        synchronized (cacheData) {
                            // 再次确认缓存确实被标记为丢弃
                            if (cacheData.isDiscard()) {
                                // 从本地缓存Map中移除该缓存数据
                                ClientWorker.this
                                        .removeCache(cacheData.dataId, cacheData.group, cacheData.tenant);
                            }
                        }
                    }
                }
            } catch (Exception e) {
                // 记录取消监听配置变更时发生的异常
                LOGGER.error("async remove listen config change error ", e);
            }

            try {
                // 短暂休眠50毫秒,避免过于频繁的操作
                Thread.sleep(50L);
            } catch (InterruptedException interruptedException) {
                // 忽略中断异常
            }
        }
    }

    // 如果进行了全量同步,更新最后同步时间
    if (needAllSync) {
        lastAllSyncTime = now;
    }

    // 如果有配置发生了变更,通知重新同步MD5
    if (hasChangedKeys) {
        notifyListenConfig();
    }
}
定时全量拉取
Nacos 2.x 版本引入了 “定时全量拉取”作为兜底策略。 客户端默认会每 5 分钟主动向服务端发起一次全量配置检查, 这就像是一次“定期核对”,确保客户端和服务端的配置最终一致。
服务端与数据库之间、客户端与服务端之间,都有定期的 MD5 对账机制(例如客户端默认每 5 分钟一次), 共同保障数据的最终一致性。
服务端收到请求后,处理如下:
java@Component
public class ConfigChangeBatchListenRequestHandler
        extends RequestHandler<ConfigBatchListenRequest, ConfigChangeBatchListenResponse> {

    @Autowired
    private ConfigChangeListenContext configChangeListenContext;

    @Override
    @TpsControl(pointName = "ConfigListen")
    @Secured(action = ActionTypes.READ, signType = SignType.CONFIG)
    public ConfigChangeBatchListenResponse handle(ConfigBatchListenRequest configChangeListenRequest, RequestMeta meta)
            throws NacosException {
        // 获取连接ID,使用StringPool优化字符串存储
        String connectionId = StringPool.get(meta.getConnectionId());
        // 获取请求头中的VIPSERVER标签
        String tag = configChangeListenRequest.getHeader(Constants.VIPSERVER_TAG);

        // 创建响应对象
        ConfigChangeBatchListenResponse configChangeBatchListenResponse = new ConfigChangeBatchListenResponse();

        // 遍历所有配置监听上下文
        for (ConfigBatchListenRequest.ConfigListenContext listenContext : configChangeListenRequest
                .getConfigListenContexts()) {
            // 构造groupKey,用于唯一标识一个配置项
            String groupKey = GroupKey2
                    .getKey(listenContext.getDataId(), listenContext.getGroup(), listenContext.getTenant());
            groupKey = StringPool.get(groupKey);

            // 获取配置内容的MD5值,用于后续比较配置是否发生变化
            String md5 = StringPool.get(listenContext.getMd5());

            // 判断是添加监听还是移除监听
            if (configChangeListenRequest.isListen()) {
                // 添加监听:将groupKey、md5和connectionId关联起来
                configChangeListenContext.addListen(groupKey, md5, connectionId);
                // 检查配置是否为最新状态,如果不是最新则需要通知客户端更新
                boolean isUptoDate = ConfigCacheService.isUptodate(groupKey, md5, meta.getClientIp(), tag);
                if (!isUptoDate) {
                    // 配置已变更,添加到变更列表中返回给客户端
                    configChangeBatchListenResponse.addChangeConfig(listenContext.getDataId(), listenContext.getGroup(),
                            listenContext.getTenant());
                }
            } else {
                // 移除监听:从监听上下文中删除对应的监听关系
                configChangeListenContext.removeListen(groupKey, connectionId);
            }
        }

        // 返回处理结果
        return configChangeBatchListenResponse;
    }

}
Spring Cloud Alibaba 源码
前面我们分析配置中的处理是通过单独的案例来讲解的。接下来我们可以看看在完整的 SpringBoot 项目中是怎么和配置中心结合起来的,首先找配置中心客户端的核心依赖,2.7+版本以后得从 org.springframework.boot.autoconfigure.AutoConfiguration.imports 文件中查找
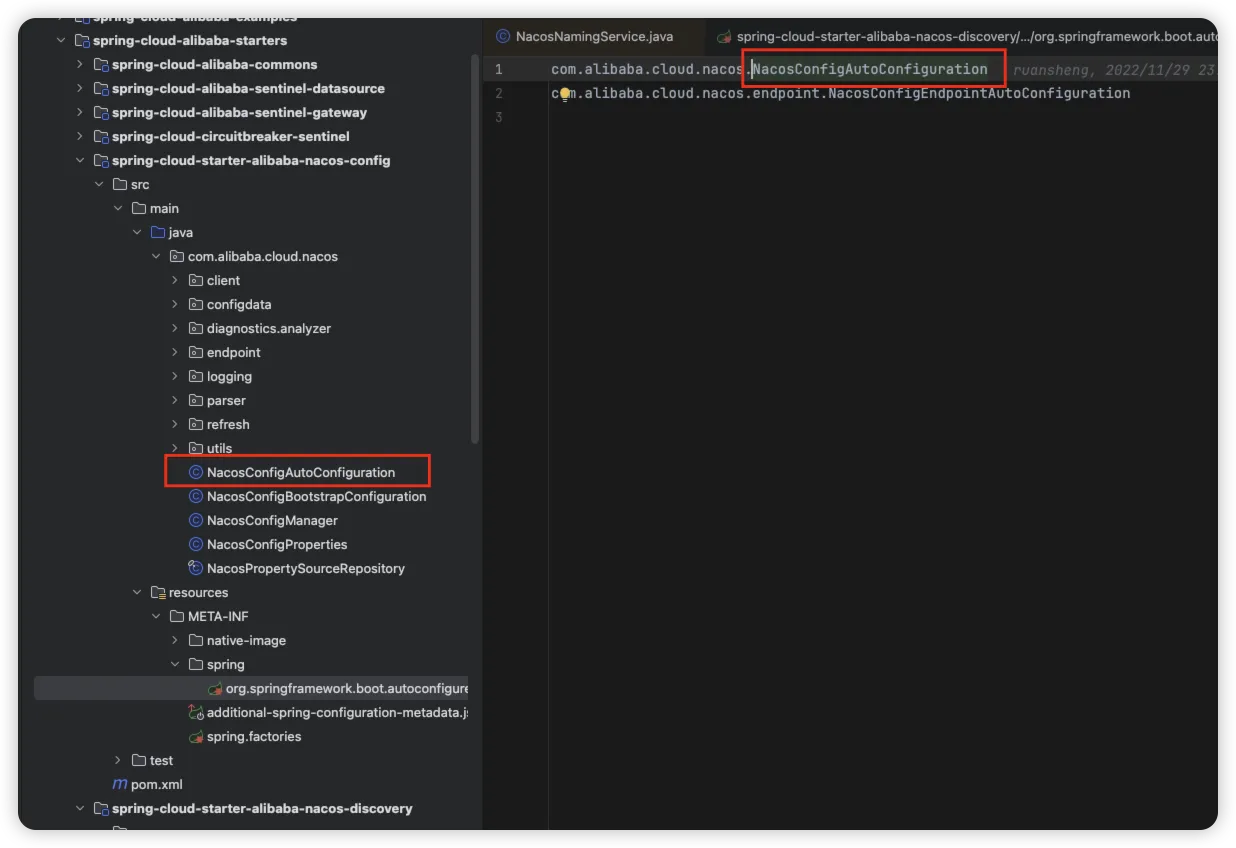
找到对应的配置类 NacosConfigAutoConfiguration 类,会把 NacosCofingManager 注入到SpringBoot 容器中
Java@Bean
public NacosConfigManager nacosConfigManager(
                NacosConfigProperties nacosConfigProperties) {
        return new NacosConfigManager(nacosConfigProperties);
}
在 NacosCofingManager 对象构建时完成了 ConfigService 对象的创建,此处就与上述案例中源码流程对上了
javapublic NacosConfigManager(NacosConfigProperties nacosConfigProperties) {
        this.nacosConfigProperties = nacosConfigProperties;
        // Compatible with older code in NacosConfigProperties,It will be deleted in the
        // future.
        createConfigService(nacosConfigProperties);
}

/**
 * Compatible with old design,It will be perfected in the future.
 */
static ConfigService createConfigService(
                NacosConfigProperties nacosConfigProperties) {
        if (Objects.isNull(service)) {
                synchronized (NacosConfigManager.class) {
                        try {
                                if (Objects.isNull(service)) {
                                        // 创建配置服务
                                        service = NacosFactory.createConfigService(
                                                        nacosConfigProperties.assembleConfigServiceProperties());
                                }
                        }
                        catch (NacosException e) {
                                log.error(e.getMessage());
                                throw new NacosConnectionFailureException(
                                                nacosConfigProperties.getServerAddr(), e.getMessage(), e);
                        }
                }
        }
        return service;
}
然后我们来看看获取配置信息的方法什么时候执行的,通过在 getConfig 方法中添加断点,我们找到了如下调用
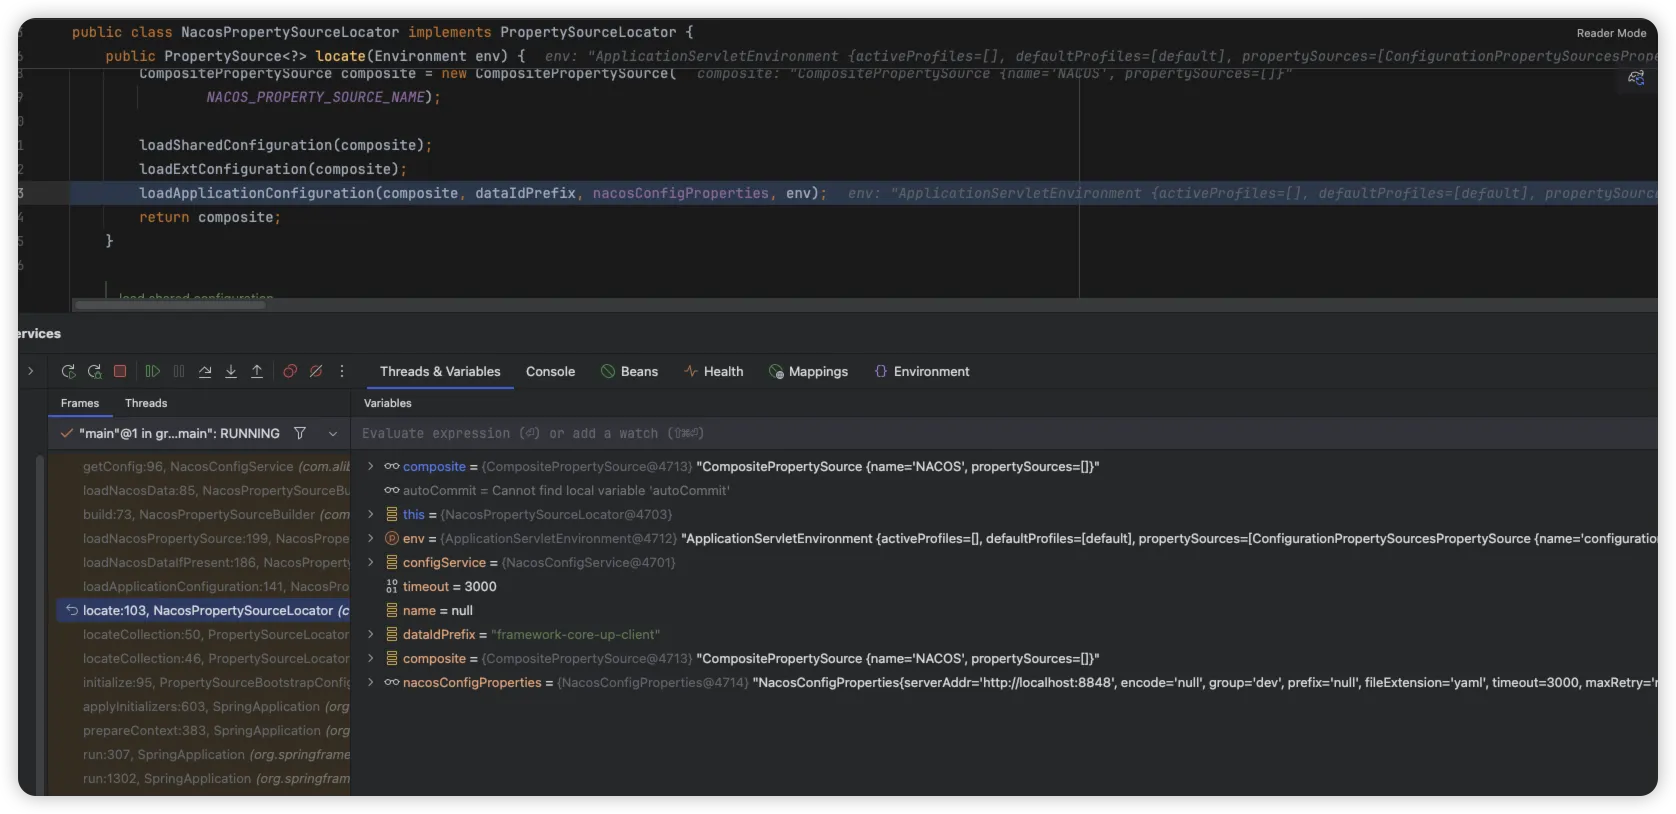
通过查看此对象,发现其在 NacosConfigBootstrapConfiguration 对象中实例化
java@Bean
public NacosPropertySourceLocator nacosPropertySourceLocator(
                NacosConfigManager nacosConfigManager) {
        return new NacosPropertySourceLocator(nacosConfigManager);
}
NacosPropertySourceLocator 实现了 PropertySourceLocator 接口,此类接口会在 PropertySourceBootstrapConfiguration 中自动加载执行 locate 接口
java@Override
public PropertySource<?> locate(Environment env) {
        // 初始化环境
        nacosConfigProperties.setEnvironment(env);
        // 创建配置服务
        ConfigService configService = nacosConfigManager.getConfigService();

        if (null == configService) {
                log.warn("no instance of config service found, can't load config from nacos");
                return null;
        }
        long timeout = nacosConfigProperties.getTimeout();
        nacosPropertySourceBuilder = new NacosPropertySourceBuilder(configService,
                        timeout);
        String name = nacosConfigProperties.getName();

        String dataIdPrefix = nacosConfigProperties.getPrefix();
        if (StringUtils.isEmpty(dataIdPrefix)) {
                dataIdPrefix = name;
        }

        if (StringUtils.isEmpty(dataIdPrefix)) {
                dataIdPrefix = env.getProperty("spring.application.name");
        }

        // 复合属性源
        CompositePropertySource composite = new CompositePropertySource(
                        NACOS_PROPERTY_SOURCE_NAME);

        // 加载共享配置
        loadSharedConfiguration(composite);
        // 加载扩展配置
        loadExtConfiguration(composite);
        // 加载应用配置
        loadApplicationConfiguration(composite, dataIdPrefix, nacosConfigProperties, env);
        return composite;
}
通过此处代码,最终在加载应用配置时,调用 getConfig 从而完成了闭环。
@RefreshScope 注解的原理
在日常开发中,我们的都知道 @Value 注解可以在项目启动时获取到配置中心的值,但是如果在 Nacos 配置中心后台修改了值,此时项目是无法动态感知修改后的值,这个时候就需要利用 @RefreshScope 注解来实现动态感知。
首先来看看 @RefreshScope 这个注解:
java@Target({ ElementType.TYPE, ElementType.METHOD })
@Retention(RetentionPolicy.RUNTIME)
@Scope("refresh")
@Documented
public @interface RefreshScope {

	/**
	 * @see Scope#proxyMode()
	 * @return proxy mode
	 */
	ScopedProxyMode proxyMode() default ScopedProxyMode.TARGET_CLASS;
}
其内部就一个属性默认 ScopedProxyMode.TARGET_CLASS,我们来跟踪来看看这个注解修饰的java类会怎么样。通过查看 Spring 容器中创建 Bean 实例的方法 org.springframework.beans.factory.support.AbstractBeanFactory#doGetBean
java... ...
if (mbd.isSingleton()) {
    // 单例Bean的实例化
}
else if (mbd.isPrototype()) {
    // 多例Bean的实例化
}
else {
    // 自定义作用域的Bean的实例化
    // scopeName为refresh
    String scopeName = mbd.getScope();
    if (!StringUtils.hasLength(scopeName)) {
            throw new IllegalStateException("No scope name defined for bean ´" + beanName + "'");
    }
    // scope为RefreshScope
    Scope scope = this.scopes.get(scopeName);
    if (scope == null) {
            throw new IllegalStateException("No Scope registered for scope name '" + scopeName + "'");
    }
    try {
        // 获取Bean对象
        Object scopedInstance = scope.get(beanName, () -> {
                beforePrototypeCreation(beanName);
                try {
                        return createBean(beanName, mbd, args);
                }
                finally {
                        afterPrototypeCreation(beanName);
                }
        });
        bean = getObjectForBeanInstance(scopedInstance, name, beanName, mbd);
    }
    catch (IllegalStateException ex) {
            throw new BeanCreationException(beanName,"Scope '" + scopeName + "' is not active for the current thread; consider " + "defining a scoped proxy for this bean if you intend to refer to it from a singleton", ex);
    }
}
被 @RefreshScope 注解的类,最终会调用 Scope 的 get() 方法实例化Bean,而此处则调用到实现 org.springframework.cloud.context.scope.GenericScope#get
java@Override
public Object get(String name, ObjectFactory<?> objectFactory) {
        // 缓存中不存在,则创建一个
        BeanLifecycleWrapper value = this.cache.put(name, new BeanLifecycleWrapper(name, objectFactory));
        this.locks.putIfAbsent(name, new ReentrantReadWriteLock());
        try {
                // 获取缓存中的对象
                return value.getBean();
        }
        catch (RuntimeException e) {
                this.errors.put(name, e);
                throw e;
        }
}
动态配置刷新的原理
@RefreshScope 作用域的 Bean 会在第一次创建时进行缓存,构建一个 Bean 生命周期包装器的内部类 BeanLifecycleWrapperCache 来对加了 @RefreshScope 从而创建的对象进行缓存,使其在不刷新时获取的都是同一个对象,知道了对象是缓存的,所以在配置修改后只需要清除缓存,重新创建就好了。
我们来看下源码中的文档中有这么一段描述 当您在配置中心修改配置的内容时,会发布 Spring 中的 RefreshEvent 事件。,我们来看下源码中是如何处理的
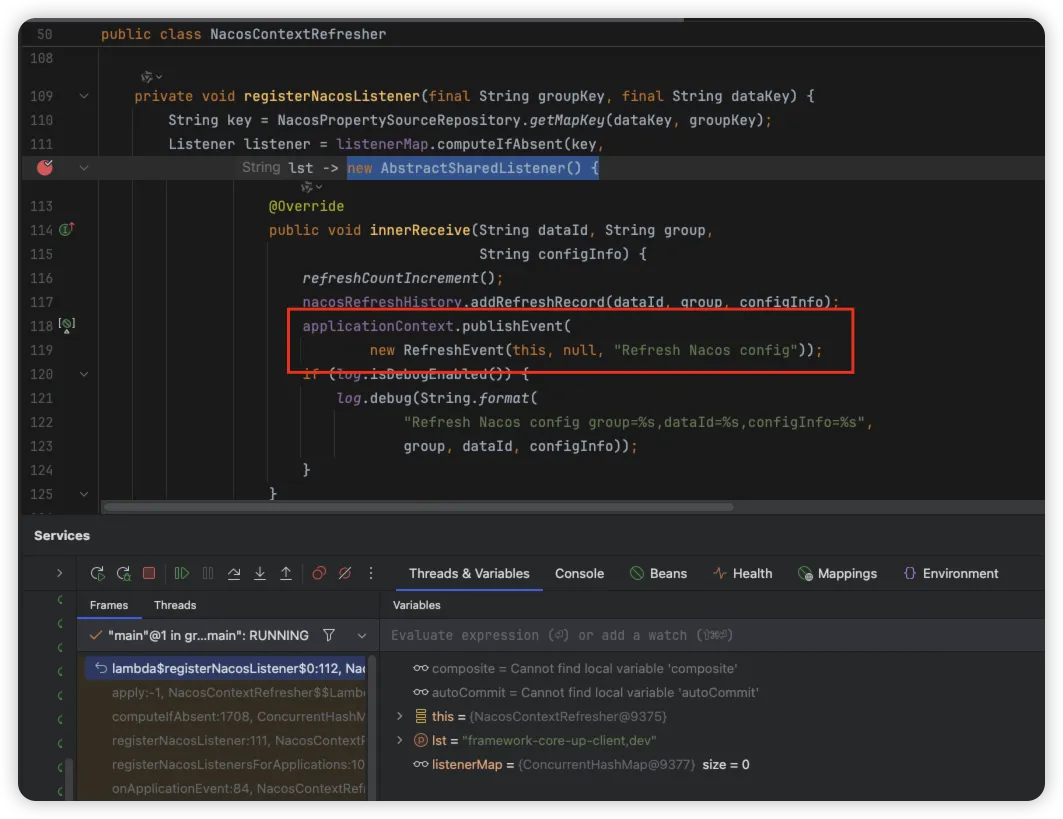
通过源码搜索发布 RefreshEvent 事件的地方,通过断点,找到上述源码位置,通过追溯,发现其通过 NacosConfigAutoConfiguration 配置类中,创建 NacosContextRefresher 的 Bean 信息,通过 onApplicationEvent 方法,会执行 registerNacosListenersForApplications 方法,添加监听器到 ConfigService 中,这也是当客户端长连接监听到配置发生变化时,自动触发监听器,发布 RefreshEvent 事件。
我们在搜索其监听的地方,找到了 RefreshEventListener 监听器用来处理容器的刷新事件
javapublic class RefreshEventListener implements SmartApplicationListener {

    private static Log log = LogFactory.getLog(RefreshEventListener.class);

    private ContextRefresher refresh;

    private AtomicBoolean ready = new AtomicBoolean(false);

    public RefreshEventListener(ContextRefresher refresh) {
            this.refresh = refresh;
    }

    @Override
    public boolean supportsEventType(Class<? extends ApplicationEvent> eventType) {
        // 只支持 ApplicationReadyEvent 和 RefreshEvent 事件处理
        return ApplicationReadyEvent.class.isAssignableFrom(eventType)
                        || RefreshEvent.class.isAssignableFrom(eventType);
    }

    @Override
    public void onApplicationEvent(ApplicationEvent event) {
        if (event instanceof ApplicationReadyEvent) {
                handle((ApplicationReadyEvent) event);
        }
        else if (event instanceof RefreshEvent) {
                // 刷新事件
                handle((RefreshEvent) event);
        }
    }

    public void handle(ApplicationReadyEvent event) {
        this.ready.compareAndSet(false, true);
    }

    public void handle(RefreshEvent event) {
        if (this.ready.get()) { // don't handle events before app is ready
                log.debug("Event received " + event.getEventDesc());
                Set<String> keys = this.refresh.refresh();
                log.info("Refresh keys changed: " + keys);
        }
    }

}
我们来看下 ContextRefresher #refresh 方法中到底干了哪些事情
javapublic synchronized Set<String> refresh() {
    // 刷新环境
    Set<String> keys = refreshEnvironment();
    // 刷新Scope
    this.scope.refreshAll();
    return keys;
}

public synchronized Set<String> refreshEnvironment() {
    // 提取环境属性源中的变量值
    Map<String, Object> before = extract(this.context.getEnvironment().getPropertySources());
    // 开始更新本地环境
    updateEnvironment();
    // 计算变更的环境变量值
    Set<String> keys = changes(before, extract(this.context.getEnvironment().getPropertySources())).keySet();
    // 发布环境变更事件
    this.context.publishEvent(new EnvironmentChangeEvent(this.context, keys));
    return keys;
}
通过上述源码中的分析可以看出,其刷新事件中,会将本地的 Environment 环境属性源进行更新,同时计算出变更的环境信息,发布一个 EnvironmentChangeEvent 变更事件,可进行自由扩展
提示
通过上述源码中的实现,我们可通过 EnvironmentChangeEvent 监听配置的变更,用来开发基于 Naocs 配置中心的各种组件信息,例如,动态线程池,动态XXX 等
通过查找,可以发现 ConfigurationPropertiesRebinder 监听了 EnvironmentChangeEvent 事件的变更,从注释中可以看出,当此类监听到环境变更的事件时,处理 @RefreshScope 标记的 Bean 实例进行重新绑定和初始化
java@Component
@ManagedResource
public class ConfigurationPropertiesRebinder implements ApplicationContextAware, ApplicationListener<EnvironmentChangeEvent> {
    // ...
    @Override
    public void onApplicationEvent(EnvironmentChangeEvent event) {
        if (this.applicationContext.equals(event.getSource())
                    // Backwards compatible
                    || event.getKeys().equals(event.getSource())) {
            // 重新绑定
            rebind();
        }
    }
}
来看下源码中是如何重新绑定的
java@ManagedOperation
public boolean rebind(String name) {
    // 检查要重新绑定的bean是否在配置属性bean列表中
    if (!this.beans.getBeanNames().contains(name)) {
            return false;
    }
    // 确保应用上下文不为空
    if (this.applicationContext != null) {
        try {
            // 从应用上下文中获取指定名称的bean实例
            Object bean = this.applicationContext.getBean(name);
            // 如果该bean是AOP代理对象,则获取其原始目标对象
            if (AopUtils.isAopProxy(bean)) {
                    bean = ProxyUtils.getTargetObject(bean);
            }
            // 确保bean对象不为null
            if (bean != null) {
                // TODO: determine a more general approach to fix this.
                // see https://github.com/spring-cloud/spring-cloud-commons/issues/571
                // 检查该bean类型是否在永不刷新列表中,如果是则跳过刷新
                if (getNeverRefreshable().contains(bean.getClass().getName())) {
                        return false; // ignore
                }
                // 销毁该bean实例,释放相关资源
                this.applicationContext.getAutowireCapableBeanFactory().destroyBean(bean);
                // 重新初始化该bean实例,应用最新的配置属性,也就是重新填充数据
                this.applicationContext.getAutowireCapableBeanFactory().initializeBean(bean, name);
                // 重新绑定成功,返回true
                return true;
            }
        }
        // 捕获运行时异常,记录错误并重新抛出
        catch (RuntimeException e) {
                this.errors.put(name, e);
                throw e;
        }
        // 捕获其他异常,记录错误并封装为IllegalStateException抛出
        catch (Exception e) {
            this.errors.put(name, e);
            throw new IllegalStateException("Cannot rebind to " + name, e);
        }
    }
    // 应用上下文为空或其他条件不满足时,返回false表示重新绑定失败
    return false;
}
其实本质就是调用 Spring 容器销毁实例对象,然后重新初始化填充最新的数据
总结
📡 服务端的长轮询与变更感知
在 Nacos 中,客户端与服务端保持一个长轮询连接来感知配置变更。 这就像是客户端在问服务端:“我关注的配置有变化吗?”如果此时没有变化,服务端不会立即回应,而是将这个请求“挂起”一段时间。 在此期间,一旦配置发生修改,服务端就能立刻发现并响应这个还在等待的连接,告知客户端:“有配置更新了。”
这种机制相比传统的频繁短轮询(频繁地问),能有效减少不必要的网络请求,提升效率,并能较快地感知到变更。
Nacos 服务端判断配置是否变更,主要依赖 MD5 校验机制。 每次配置更新,服务端都会计算新配置的 MD5 值。只有当 MD5 值发生变化时,才会触发后续的更新流程。 这确保了只有真正的内容变更才会通知客户端,避免了不必要的刷新。
📱 客户端的处理与配置应用
客户端在收到服务端的配置变更通知后,并不会立即盲目应用。它会重新拉取最新的配置内容,并计算其 MD5 值,与本地缓存的旧配置 MD5 值进行比对。 这可以看作是一次客户端的“二次校验”,确保需要处理的确实是发生了变化的配置。
MD5 校验通过后,客户端会发布一个 RefreshEvent 事件。 在 Spring Cloud 环境中,这个事件会被 RefreshEventListener 捕获,继而触发 Spring Cloud 自身的配置刷新机制。
获取变更后的配置信息
在 RefreshEventListener 监听器中,会提取本地缓存中的 Environment 环境信息进行变更对比,将本地环境中发生变更的属性,通过发布 EnvironmentChangeEvent 事件从而对 @RefreshScope 注解的 Bean 实例进行重新绑定与初始化。
对于 Spring 应用,配置的动态更新主要借助 @RefreshScope 注解。 被它标记的 Bean(比如使用了 @Value 注入配置的类),在配置刷新事件触发后,会被特殊处理:Spring 容器会销毁这些 Bean 的实例,当下次请求到来时,再重新创建。在新实例的创建过程中,@Value 等注解会重新解析,从而注入最新的配置值。 这就实现了应用级别的热更新,无需重启服务。
🛡️ 确保可靠性与一致性
任何系统都不能保证百分之百无故障,Nacos 的配置刷新机制也考虑了这一点。
-
防止推送失败的后备措施:尽管长轮询机制力求实时,但网络波动等因素可能导致推送失败。为此,Nacos 2.x 版本引入了 “定时全量拉取”作为兜底策略。 客户端默认会每 5 分钟主动向服务端发起一次全量配置检查, 这就像是一次“定期核对”,确保客户端和服务端的配置最终一致。
-
最终一致性保障:Nacos 服务端节点之间通过自研的通知协议来同步配置缓存,以确保所有节点数据一致。 此外,服务端与数据库之间、客户端与服务端之间,都有定期的 MD5 对账机制(例如客户端默认每 5 分钟一次), 共同保障数据的最终一致性。
-
务必通过控制台或 API 修改配置:一个重要原则是,切勿直接修改数据库中的配置。 因为这绕过了 Nacos 服务端的配置管理流程(比如 MD5 计算和变更通知),很可能导致配置不一致或客户端无法接收到更新通知。
⚠️ 注意事项
-
正确使用 @RefreshScope:需要动态刷生的 Bean 应使用 @RefreshScope 注解。 注意,刷新时这些 Bean 会被重建,考虑其状态和性能影响。
-
关注客户端日志:若遇配置刷新不生效,可检查客户端日志(如 nacos/config.log)。 关注 add-listener(监听器注册)、data-received(接收数据)、notify-ok(通知成功)或 notify-error(通知出错)等关键字,有助于定位问题。
-
理解版本差异:Nacos 2.x 相比 1.x,在通信模型(如引入 gRPC)和性能上有显著改进,但其配置动态刷新的核心原理(长轮询 + MD5 校验 + 事件驱动)保持一致。


本文作者:柳始恭
本文链接:
版权声明:本博客所有文章除特别声明外,均采用 BY-NC-SA 许可协议。转载请注明出处!